Gunshot wounds are serious injuries that require immediate medical attention. In some situations, especially before professional help arrives, proper wound care can be the difference between life and death. One of the most important techniques in this type of emergency care is the use of an occlusive dressing. It prevents air from entering the wound and helps manage blood loss, ensuring that the wound is sealed and protected from external contamination.
Learning how to apply it correctly is crucial for anyone involved in emergency care, from professionals to bystanders.
This guide walks through the process of properly using an occlusive dressing to care for gunshot wounds. The steps are simple but vital to prevent further complications.
Page Contents
Key Points
- Clean the wound area before applying the dressing.
- Ensure that the dressing covers the entire wound.
- Apply firm pressure without compromising the patient’s ability to breathe.
- Use proper materials like commercial occlusive dressings or improvised ones.
- Monitor for signs of tension pneumothorax after sealing chest wounds.
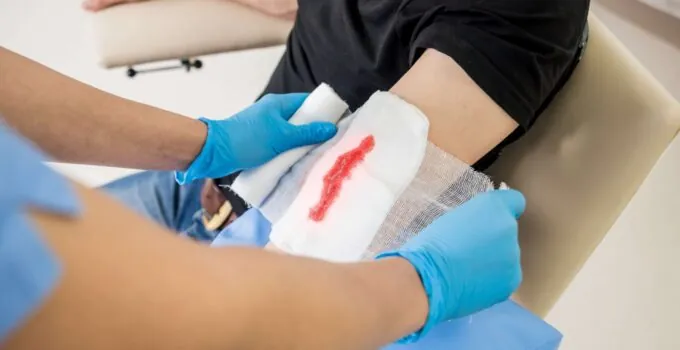
Preparation for Applying Occlusive Dressings
Source: steroplast.co.uk
Preparation is essential when caring for a gunshot wound. First, evaluate the situation to ensure that the scene is safe. Always check that the patient is stable before starting any wound care procedure. In cases involving the chest or abdomen, it’s crucial to prepare to treat an open wound with an occlusive dressing as quickly as possible.
A ready-to-use occlusive dressing can be found in first aid kits or tactical medical kits. It is important to know how to choose the best ones.
Materials Needed
Before applying non-permeable patch, ensure the following materials are available:
- Sterile gauze or commercial occlusive dressing
- Tape or adhesive materials
- Gloves (if possible)
- Scissors (to cut the dressing or tape)
- Antiseptic wipes (if available)
Having these materials ready makes the process faster and helps reduce risks of infection.
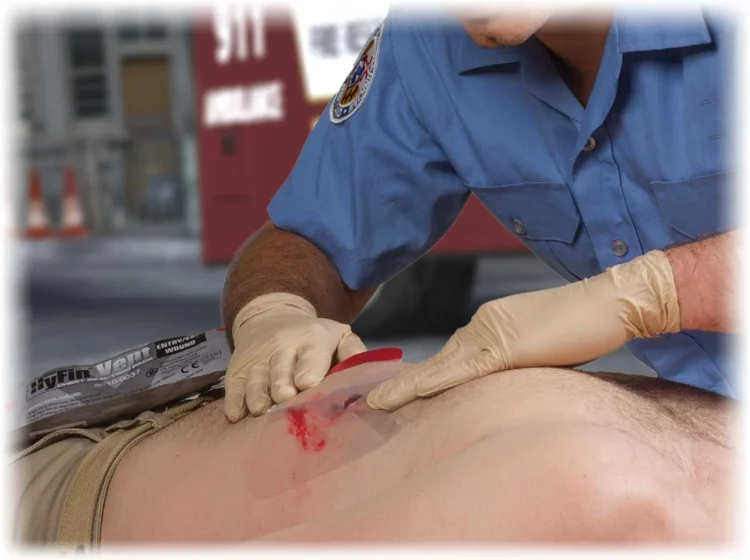
Step-by-Step Guide for Applying an Occlusive Dressing

Source: verywellhealth.com
Assess the Wound
Begin by assessing the gunshot wound. If it is a penetrating injury to the chest or abdomen, proceed with care. The primary concern is stopping the air from entering the chest cavity while also preventing further blood loss.
Clean the Area
If possible, clean the wound area before applying the seal. Use antiseptic wipes to gently wipe the edges of the wound. Cleaning helps remove dirt and bacteria that could cause infection. However, do not waste time on cleaning if the injury is critical.
Prepare the Dressing

Source: m.youtube.com
If using a commercial occlusive dressing, follow the manufacturer’s instructions. If using an improvised one, cut a piece of plastic, foil, or any non-breathable material that can seal the wound. Make sure it is large enough to cover the entire wound with an extra inch or two around it.
Apply the Dressing
Place the patch directly over the gunshot wound. Ensure that it covers the wound completely. If there is an exit wound on the opposite side, apply another occlusive dressing there as well. Press firmly but carefully to ensure the seal is tight.
Secure the Dressing
Once the pad is applied, use medical tape or any available adhesive to secure it in place. Tape down three sides, leaving one side open to allow air to escape. If it’s a chest wound, this prevents the risk of tension pneumothorax, which is a build-up of air in the chest cavity.
Monitor the Patient
Afterwards, continuously monitor the patient for signs of distress. Look out for difficulty breathing, pale skin, or loss of consciousness. If any of these symptoms arise, adjust the seal immediately. It may need to be temporarily removed to relieve built-up pressure before reapplying it.
Common Mistakes to Avoid

Source: youtube.com
- Not cleaning the wound: Cleaning is essential to avoid infections, though it must be quick.
- Not securing the dressing properly: Ensure it is taped down well to prevent air from leaking.
- Using breathable materials: Avoid using materials like cloth or gauze that allow air to pass through.
Types of Occlusive Dressings
There are various types of non-permeable patches available, and knowing which one to use can make a significant difference in how effective the treatment is. Some are specifically designed for chest wounds, while others are multi-purpose. The two main categories are:
Commercial Occlusive Dressings
These are pre-packaged and sterile. They come in different shapes and sizes, designed to cover wounds completely. They are easy to apply and are preferred for emergency situations where time and accuracy matter.
Improvised Occlusive Dressings
In the absence of commercial products, any non-breathable material like plastic wrap, foil, or even a credit card can be used as an occlusive dressing. These materials are effective in sealing the wound, though they may not adhere as well as commercial options.
Aftercare for Gunshot Wounds
Source: vdev.group
Once the occlusive dressing is applied, focus shifts to maintaining the patient’s condition while waiting for professional medical help. Ensure the patient is kept calm and still to avoid further trauma. Keep monitoring vital signs such as breathing rate and level of consciousness. If the dressing becomes loose or air begins to enter the wound, reapply it immediately.
Important Considerations for Chest Wounds
Chest wounds require special care when applying an occlusive dressing. After sealing the wound, always leave one side of the dressing untaped. This method allows trapped air to escape but prevents new air from entering, reducing the risk of tension pneumothorax.
If the patient shows signs of difficulty breathing or a drop in blood pressure, it’s essential to address the wound and re-evaluate the dressing immediately. Adjust the untaped side to ensure that air can escape while maintaining a strong seal.
FAQs
1. How long should the occlusive dressing stay on the wound?
The occlusive dressing should stay on until professional medical care is available. It should only be removed if it compromises breathing.
2. Can any plastic wrap be used as an occlusive dressing?
Yes, in emergencies, any non-breathable plastic wrap or foil can serve as an improvised occlusive dressing.
3. Should the dressing cover both the entry and exit wounds?
Yes, if there are both entry and exit wounds, both should be sealed with occlusive dressings.
4. What should be done if air is trapped under the dressing?
If air becomes trapped, lift the untaped side of the dressing to allow the air to escape, then re-secure it.
5. Are occlusive dressings reusable?
No, occlusive dressings are single-use and should be replaced with a new sterile dressing once possible.
Conclusion
Knowing how to apply an occlusive dressing is a crucial skill in emergency gunshot wound care. It can save lives by preventing further complications such as infections and tension pneumothorax. Always use sterile materials when available, but in emergencies, improvised materials like plastic wrap can still provide life-saving benefits.


